How to Tape a Feeding Tube
What You Need * Videos * Types of Feeding Tubes * Feeding Instructions * Care and Cleaning
If you are unsure about whether or not you need a feeding tube, you can read about when to get one. You can also read about my experience with a feeding tube, and a time when I didn't get one and should have.
Feeding through a feeding tube is similar to oral feeding. A lot of the same principles on speed and amount apply.
- Start slowly – give smaller amounts more frequently before moving up to the max amount
- Feeding approximately every 4-6 hours is ideal
- If you are giving medications that need to be separated from supplements that are in your pre-filled syringes you can do that by adding them to plain baby food
- Baby food is a little better than plain water because you are also getting calories into your cat along with the medications and the consistency of baby food is perfect for syringing through the tube
What You Need
| Product | Where I've Purchased & Notes |
| Food | Chewy Your vet may select a different food for your cat than the one I have linked |
| Instructions on preparing the food | These should come directly from your vet and will be customized based on the food you are using. The two foods I have used were as follows: One 5.5oz can Purina CN blended with 25ml water OR One 5.1oz can Royal Canin Recovery blended with 22ml water |
| Syringes | Luer Slip syringes on Amazon Luer Lock syringes on Amazon Personally I like 20ml syringes but you can use larger or smaller depending on how they feel in your hand. Your vet will initially provide you with some syringes in various sizes. I prefer Luer Slip for tube feeding. Sterile syringes are not necessary, but I purchase sterile vs the non-sterile options because I also do syringe method for subq fluids and I like the option of using my syringes for either task. Syringes can be reused as long as they are cleaned properly between feedings. At some point the rubber in the plunger will break down and make the syringe hard to use. That's when you should discard the syringe and use a new one. |
| IV extension lines | Thriving Pets Your vet may provide you with these as well. These can be reused as long as they're cleaned properly between feedings. Extension lines provide extra flexibility and allow for additional movement of either you or your cat during feedings. They're not required, but definitely recommended. |
| Christmas Tree Adapter | Blowout Medical Your vet may provide these as well. These can be reused as long as they're cleaned properly between feedings. Not required, but they do make it possible to use the IV extension line and any type of syringe securely with your feeding tube. |
| Kitty Kollar | Kitty Kollar Definitely recommended! Your vet may provide one for you, so be sure to ask before purchasing one on your own. If possible it's a good idea to have at least 2 so you can always have a clean one ready to use. If you are purchasing one yourself I recommend getting the Double Velcro version. The Kollar will come with some protector pads so you should not need to purchase any of those. The adapter they sell may not work with your feeding tube so I would skip that too. Just get the Kollar and nothing extra. |
| Brushes for cleaning syringes and adapters | Amazon Not necessary, but definitely recommended |
| Blender for mixing food | Amazon or any local big-box or department store, maybe even a local grocery store Any blender will do. I use a bullet-style blender. |
Videos
This video covers how to maintain and use an E-tube style feeding tube very well. But be sure to check with your own vet regarding how to clean the tube insertion site on your cat. This video mentions using hydrogen peroxide as one possible way to clean the site, but hydrogen peroxide is not recommended for wound care .
Here's another good video on feeding through an E tube:
Types of Feeding Tubes
There are 4 different types of feeding tubes that can be used in cats.
Naso-esophageal (NE-tube) tubes are very small tubes that are run from the nose down into the stomach. These kinds of tubes are used if the cat is expected to need the feeding tube for 1 week or less, or for cats who can't tolerate anesthesia to have other kinds of tubes placed. These kinds of tubes can be easily dislodged, and require an entirely liquid diet because of their small size.

Esophageal (E-tube) tubes are the most common type of feeding tube used in cats. These are surgically implanted in the throat and dump food into the esophagus, allowing it to follow the normal path to the stomach. These tubes allow for thicker food to be used than the NE-tube can allow. E-tubes can be used long term and generally make it very easy to supply food, water, and medicines to a cat.
Gastrotomy (G-tube) tubes are implanted in a cat's side and dump food directly into the stomach. The G-tube is not commonly used in cats because tube placement is more difficult than the E-tube, but for cats with esophageal injuries or disorders the G-tube is a great option. The G-tube can also be used in cats who developed any kind of injury or infection around the insertion site of an E-tube.

Jejunostomy (J-tube) tubes are implanted in a way that dumps food directly into the intestines, completely bypassing the stomach and normal digestive processes. This type of tube is only used in a hospital setting and you will never be sent home with this kind of implant. The J-tube requires special equipment to constantly deliver very small amounts of food to the intestines.
Working With a Feeding Tube
The information below was written about using an E-tube, but also applies to a G-tube. If you're using an NE-tube you'll need to thin the food more than with the E or G tubes, and some of the site cleaning/maintenance steps will not apply to you.
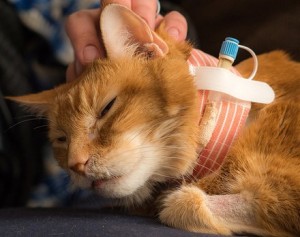
If you have an E-tube your vet may fasten the bandages too tight around the tube. You can probably loosen them a lot. A Kitty Kollar is a great, washable neck bandage that can be used to hold the tube in place. You can extend the use between washings by covering the Kitty Kollar with the "tube" part of a large sport sock. If you use the sock covering you can simply change out the sock bit and not need to wash the Kitty Kollar itself as often.
There are two styles of Kitty Kollar, double or single velcro. Here you can see Oliver modeling both styles. After using both I definitely prefer the double velcro style because it keeps the tube much more secure.

Step-by-Step Tube Feeding Instructions
The following steps are copied directly from University of Missouri's Veterinary Health Center at https://vhc.missouri.edu/small-animal-hospital/small-animal-internal-medicine/diseases-and-treatments/esophagostomy-tube-information-and-care/
Before you get started it is a good idea to be prepared with everything you will need for the entire feeding process. Here's the basic kit I used with Oliver when he was on a feeding tube.


Step 1: Check that the tube is in place. Remove the end of the tube from the neck wrap. Before each feeding, attach an empty syringe (10 cc) to the external feeding port and pull back on the plunger. If the tube is in place, the plunger should move back to its starting position on its own (negative pressure), and you may proceed to step 2. If the plunger does NOT move back to its starting position, DO NOT PROCEED WITH FEEDING. The tube may be displaced, and you should call a veterinarian for further instructions.
Step 2: Flush the tube with water. Give 10 mL of lukewarm water through the tube. If there is no cough, gag, retch or discomfort, prepare an extra syringe with lukewarm water to use for flushing the tube when the feeding is complete. If coughing or gagging DOES occur, DO NOT PROCEED WITH FEEDING. The tube may be displaced, and your pet needs to be brought to a veterinarian to check the placement of the tube.
Step 3: Warm the blended diet. Keep opened containers of the blended diet refrigerated between feedings. Before each feeding, slightly warm the expected feeding volume (see above under diet information for amount) to room temperature. The best way to warm the food is to fill the syringes with the amount of food to be fed and place them in a container of warm water or run under warm water. Due to the risk of overheating, it is NOT recommended to use the microwave. If you do use the microwave, warm the food in a bowl and mix well before pulling it into a syringe. You can test the temperature on your wrist like checking the temperature of a baby bottle. The food should be room temperature to lukewarm, not hot or cold.
Step 4: Feeding. Attach the syringe to the feeding port. This will require you to remove the cap on the port, but keep the cap in easy reach. Once the syringe is attached, you will likely need to flip the tube clamp to the open position. After that is done, you can begin slowly pushing the plunger on the syringe to administer the food. It is important to feed the liquid diet slowly (i.e., each meal over 20 minutes) since the food is not going directly into the stomach but instead into the esophagus. If the pet begins to act nauseated during the feeding, it is time to stop or at least slow down dramatically. If they become too full, your pet will likely throw up! If you determine that the volume of food you are to give at each feeding consistently makes your pet nauseated, please call your veterinarian to discuss modifying the feeding schedule.
Step 5: Finishing. Once the food syringe is emptied, re-close the clamp on the tube. Now, detach the food syringe and attach the extra syringe of water. Again open the clamp, and flush the tube with 10 mL of water. You can give the water a bit faster than you did the food. Once you are done, close the clamp, remove the syringe, and re-attach the cap on the end of the tube. Tuck the tube back into the neck wrap so that your pet can't easily pull the tube out. Rinse out the syringes so that they are ready for next time, and you are done until the next meal.
Care and Cleaning of Feeding Tubes
Clogs
In the event that the feeding tube clogs, use Coca Cola Classic to unclog the tube. Infuse about 5 mL of cola into the tube and let it sit for 10 minutes, then flush the tube with water according to the feeding instructions above. If you are unsuccessful at unclogging the tube in three successive attempts, consult your veterinarian.
Cleaning the Entrance Site
Examine the skin on your cat's neck every single day around where the tube is inserted. Check for discharge, swelling, redness, or a foul odor. You will need to make sure the fur on your cat's neck is short enough for you to properly inspect the site. Your vet will shave the area before placing the tube. If your cat's fur grows particularly fast, or if your cat is wearing the tube for a long time you may need to perform touch-up shaves to keep the hair short enough for the site to be visible. Your vet may provide touch-up shaves for you as part of follow up visits, so be sure to ask about that.
A small amount of swelling and discharge may be normal, and can be gently cleaned by blotting (NOT rubbing!). To clean the site you can use sterile gauze or sterile non-stick bandage material. Other materials like paper towels or clean cloth may be used, but are not recommended because they can introduce bacteria to the site and cause an infection.
Contact your veterinarian immediately if you notice green or yellow discharge, a foul smell, increased swelling or redness, pain or tenderness.
You will need to keep the entrance site for the tube clean, dry, and loosely covered.
According to Kitty Kollar: Your vet may give you products to clean the site. Or, you may use Betadine® or Chlorhexedrine® solution 10% to water 90% to gently pat the area when you change the bandaging. Bandages or coverings should be placed loosely so that the site can breathe, and never let the area stay wet or moist. Do NOT use Triple Antibiotic ointment ("Neosporin") unless directed by your veterinarian. Some cats have adverse allergic reactions to one of the ingredients. Your veterinarian can prescribe a different ointment if it is needed, but usually just keeping the site clean is adequate. Never use alcohol or peroxide for cleaning.
Source: https://felinedm.com/tips-tricks-and-how-to-do-stuff/feeding-tubes/
0 Response to "How to Tape a Feeding Tube"
Postar um comentário